|
|
The Joe’s Bridge mission uses the Combined XXX Corps bombardment, Ambush (page 266), Reserves (page 268), Prepared Positions (page 264) and Ready and Waiting special rules.
Your Orders
Allied
Gentlemen, this is a story that you shall tell your grandchildren, and mightily bored they'll be. Our job is to punch a hole through the German front line, here, and then drive like hell up this road.
Axis
The Allies have held a bridgehead north of the canal for seven days now, and since they have reinforced it heavily. Expect an attack from their bridgehead anytime now, there can be no further retreat.
|
|
Preparing for battle
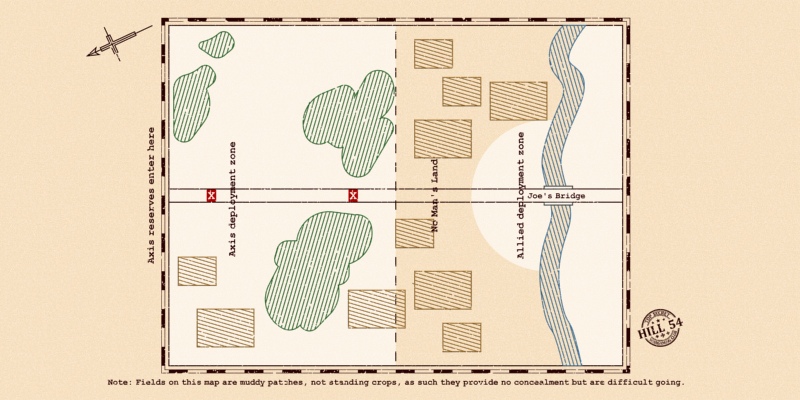
- The Axis deployment zone is all of the northern half of the table.
- Two Objectives are placed by default on the road, 20cm from each edge of the Axis deployment zone (X).
- Next the Axis players nominate at least half of their platoons to be held off the table in Reserve. These Reserves will arrive along the short table edge in the Axis players’ table half.
- The Axis players may then nominate up to two of the remaining platoons to be held in Ambush.
- Finally, they Deploy the remaining platoons.
- The Allied deployment zone includes everything south of the Maas-Scheldt canal as well as everything within a 40cm circle centred on the northern end of Joe’s Bridge. They now Deploy all of their platoons.
- Both sides now deploy any Warrior teams that are not part of a platoon, and all Independent teams. Warriors and Independent teams may also be held in reserve, providing that at least one platoon that they can legally join held in reserve, in this case, they will arrive from reserve with that platoon.
|
|
Beginning the Battle
- The Allied players now conduct their Combined XXX Corps bombardment.
- The Allied players make Reconnaissance Deployment moves for any Recce teams they have on table. The Axis players may not make Reconnaissance Deployment moves in this mission.
- The Allied players have the first turn. As both sides are in Prepared Positions, all platoons may begin the game Dug In.
Ending the Battle
The battle ends when either:
- the Allied players have Taken the Objectives at the start of their turn
- or the Axis players start any of their turns from turn six with no Allied teams in the Axis half of the table.
Deciding Who Won
The Allied players win if the game ended because they started one of their turns holding the Objective. They have punched a hole through the frontline, and continue on their way to Eindhoven.
Otherwise the Axis players win. Their ambushes stunned the enemy and put them severely behind schedule.
Calculate your Victory Points using the Victory Points Table below.
|
|
Mission Special Rules
The Joe’s Bridge mission uses the Combined XXX Corps bombardment, Ambush (page 266), Reserves (page 268), Prepared Positions (page 264) and Ready and Waiting special rules.
Combined XXX Corps bombardment
Any teams deployed in trenches or gun pits are not affected by this rule, if an entire platoon is deployed in trenches, you can ignore that platoon completely – except for the pinned down effect. Ignore all Warriors and independent teams completely.
For all Axis platoons deployed on the table (including those in Ambush), carry out an artillery bombardment. Teams are hit on 4+. The bombardment has AT 5 and FP 4+.
All deployed Axis platoons begin the game pinned down or bailed out, even if they are deployed in trenches or gun pits. Teams destroyed by this bombardment does not count as destroyed for morale purposes.
Ready and Waiting
The Axis players receive eight sections of trenches and two HMG nests in addition to any fortifications they may already have in their force. All fortifications in this mission, must be deployed at least 5 cm from the main road. Trenches may be converted to gun pits at a 1:1 rate, and trenches and gun pits may be assigned to platoons in Ambush, in which case they are not deployed until that platoon is revealed.
The Axis players also receive one mine field in addition to any obstacles they may already have in their force. Obstacles may be deployed anywhere in the Axis deployment zone or No Man’s land (provided that they obey any deployment restriction that are inherit to them).
Victory Point Table
The winning players has lost one or no platoons - Stunning Victory 6:1
The winning players has lost two or three platoons - Major Victory 5:2
The winning players has lost four or more platoons - Minor Victory 4:3
If a winning player started the game with nine or more platoons in the player's own company (not including transport platoons), the first destroyed platoon from that company is ignored when determining the victory points above.
|
| |
|