|
|
The Oosterbeek mission uses the Oosterbeek Withdrawal, Dusk (page 273), Ambush (page 266) and Prepared Positions (page 264) special rules.
Your Orders
Allied
Withdraw?! Two days they said, we have been here nine. One bloody mile, you would think they could accomplish that… Charles, we have been given our marching order.
Axis
The allies have tried to reinforce their bridgehead with limited success, now you must quickly cut off their access to the river, then they will have no choice but surrender.
|
|
Preparing for battle
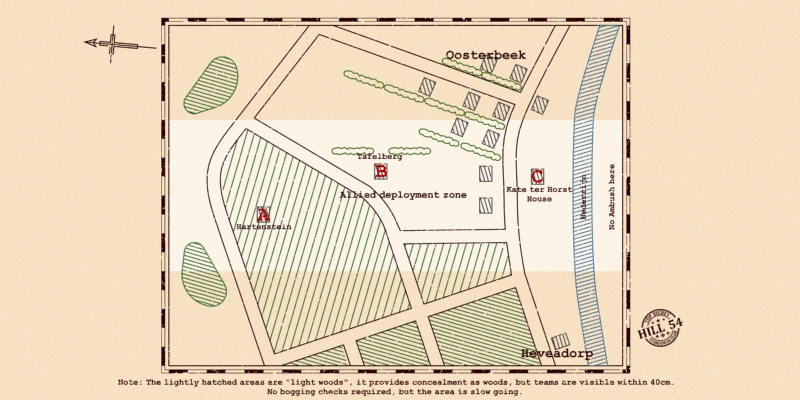
- Dividing the table along the short table edges, The Allied deployment zone is 40cm on either side of the centre. Although it is part of the Allied deployment zone, platoons deployed south of the Nederrijn may only perform artillery bombardments and no Ambush may be deployed there.
- The Objective are the houses placed at (A), (B) and (C).
- The Allied players deploy their entire force. They may hold one platoon in Ambush.
- The Axis player now deploys their entire force on the table, more than 40cm from enemy teams within Line of Sight, or more than 20cm from teams that are entirely out of Line of Sight. However, the Axis players may not deploy in the area south of the Nederrijn.
- Starting with the Allied players, both sides now deploy any Warrior teams that are not part of a platoon, and all Independent teams.
|
|
Beginning the Battle
- Starting with the Allied players, both sides make Reconnaissance Deployment moves.
- The Axis players have the first turn.
- As both sides are in Prepared Positions, all platoons may begin the game Dug In.
Ending the Battle
The battle ends when either:
- the Axis players have Taken any of the Objectives at the start of their turn, or
- at the start of the Allied players’ tenth turn (remember to check Company Morale if necessary before determining who won).
Deciding Who Won
The Axis players win if the game ended because they started one of their turns holding an objective. The Axis have either smashed the bridgehead completely or cut them off from any chance of relief.
Otherwise the Allied players win. They have managed to withdraw the remaining soldier from the bridgehead, leaving only the severely wounded to go into captivity.
Calculate your Victory Points using the Victory Points Table below.
|
|
Mission Special Rules
The Oosterbeek mission uses the Oosterbeek Withdrawal, Dusk (page 273), Ambush (page 266) and Prepared Positions (page 264) special rules.
Oosterbeek Withdrawal
Starting with turn three, in the starting step when they would normally roll for Reserves, the Allied players counts the number of platoons that have on the table.
- If the number is 10 or more, the Allied players must withdraw two platoons.
- If the number is 5 or more (but below 10), the Allied players must withdraw one platoon.
- If the number is less than 5 platoons, they gain a delay counter.
Add the number of delay counters to the number of platoons that you have on table, when working out whether to withdraw a platoon this turn. When you withdraw a platoon, remove all delay counters as well.
When withdrawing a platoon, all of the teams of the chosen platoon are removed from the table and it is considered to have withdrawn. If a withdrawing platoon is both below half strenght and has teams within 20 cm of enemy teams, there is a chance of their withdrawal breaking into a rout. Make a Skill Test before removing the teams.
- If the platoon passes, they successfully withdraw.
- If they fail, they withdraw, but the whole platoon count as Destroyed.
Platoons that withdraw successfully count as neither on the table nor destroyed for the purpose of Company Morale Checks.
At the start of their 8th turn the Allied players remove objective (A) and at the start of their 9th turn, the Allied players remove objective (B).
Withdrawal Summary
Turn 3 – Allied players withdraws two platoons if 10+ platoons, one platoon if 5+ platoons, otherwise gain a delay counter.
Turn 4 - Allied players withdraws two platoons if 10+ platoons, remove all delay counters and one platoon if 5+ platoons or counters, otherwise gain a delay counter.
Turn 5 - Repeat Withdrawal.
Turn 6 - Repeat Withdrawal.
Turn 7 - Repeat Withdrawal.
Turn 8 – Remove objective (A). Repeat Withdrawal.
Turn 9 - Remove objective (B). Repeat Withdrawal.
Turn 10 - Check company morale if necessary - Game over.
Victory Point Table
The winning players has lost one or no platoons - Stunning Victory 6:1
The winning players has lost two or three platoons - Major Victory 5:2
The winning players has lost four or more platoons - Minor Victory 4:3
If a winning player started the game with nine or more platoons in the player's own company (not including transport platoons), the first destroyed platoon from that company is ignored when determining the victory points above.
|
| |
|