|
|
The Hill 112 mission uses the Defensive Battle, Modified Scattered Reserves, Delayed Reserves (page 266), There are No Draws (page 275) and Meeting Engagement (page 264) special rules.
Your Orders
Allies
In the push on Hill 112 you have encountered strong opposition, but you know the supporting units are on their way. You should press the attack now while the emeny are still weak and seize one of your objectives.
Axis
A section of the line has crumble and it’s fallen upon your shoulders to repel the enemy advance. Act aggressively until assistance arrives, then push the Allied attack back to their starting points.
|
|
Preparing for battle
- Determine who will be the attacker using the Defensive Battle special rule.
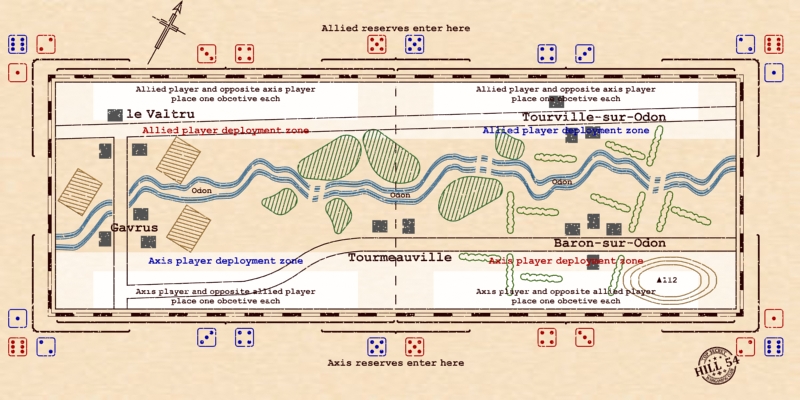
- The Allied deployment zone is within 30cm from the long northern table edge. The Axis deployment zone is within 30cm from the long southern table edge.
- Both sides determines, what half of the table edge, each of the players of their own side will deploy in, writing down their decision, and revealing the result to the other side simultaneous.
- Starting with the attacking players, all players place an Objective in their own deployment zone. Starting with the attacking side, all players then place a second objective, this time in the enemy deployment zone on the opposite side of the table. All objectives must be placed within 20cm of the long table edges and at least 20cm from the long table edges and table centre.
- Starting with the attacking players, all players now nominate at least half of their platoons to be held off the table in Delayed and Modified Scattered Reserves.
- Starting with the attacking players, all players now alternate deploying their remaining platoons.
- Starting with the attacking players, both sides now deploy any Warrior teams that are not part of a platoon, and all Independent teams. Warriors and Independent teams may also be held in reserve, providing that at least one platoon that they can legally join held in reserve, in this case, they will arrive from reserve with that platoon.
|
|
Beginning the Battle
- Starting with the attacking players, both sides may make Reconnaissance Deployment moves for any Recce teams they have on table.
- All players now roll a die. The player who finished deploying his platoons first adds +1 to the roll. If both players, on one side, finished deploying before the other side they add another +1 to the roll. The team with the higher total result has the first turn. In the event of a tie roll again.
Ending the Battle
The battle ends when:
- Any player has taken any of the Objectives in the enemy's deployment zone at the start of their turn
Deciding Who Won
The players that took an Objective in the opponent’s deployment zone wins the battle. They have secured key terrain, forcing the enemy onto the defensive, and opening the way for the final, decisive blow.
Calculate your Victory Points using the Victory Points Table below.
If neither side won use the There are No Draws special rule to determine their Victory Points.
|
|
Mission Special Rules
The Hill 112 mission uses the Defensive Battle, Modified Scattered Reserves, Delayed Reserves (page 266), There are No Draws (page 275) and Meeting Engagement (page 264) special rules.
Defensive Battle
Determine which side will be the Attacker and Defender.
Each team of players will decide the point total of their force from the list below:
0 point: All lists with a "Must Defend" special rule.
1 point: All Infantry lists.
2 point: All Mechanised lists.
3 point: All Tank lists.
4 point: All lists with a "Must Attack" special rule.
The team with the most point will be the attacker.
If both teams have the same point total, then any "Must Attack" or "Must Defend" rule will be a tie-breaker. If both teams are still at the same point total, each team roll a die and add this to their total, and continue to do this until one team have more points than the other.
Modified Scattered Reserves
For this mission, each company will nominate reserves separately from their side, and each player will roll for reserves in the starting step.
When a platoon arrives from Modified Scattered Reserves. Roll a die.
1-2: The platoon arrives within 40cm of the corner in your own table half.
3-4: The platoon arrives on the table edge, in your own table half.
5: The platoon arrives within 40cm of the middle of your side's table edge.
6: The platoon arrives within 40cm of the corner in the other player's table half.
Victory Point Table
The winning players has lost one or no platoons - Stunning Victory 6:1
The winning players has lost two or three platoons - Major Victory 5:2
The winning players has lost four or more platoons - Minor Victory 4:3
If a winning player started the game with nine or more platoons in the player's own company (not including transport platoons), the first destroyed platoon from that company is ignored when determining the victory points above.
|
| |
|