|
|
The River Wall mission uses the Both Ends At Once, Prepared Positions (page 264), Delayed Reserves (page 269), The River Is Wide… and Only Protection special rules.
Your Orders
Allied
I'm sending two companies across the river by boat. I need a man with very special qualities to lead. He's got to be tough enough to do it and he's got to be experienced enough to do it. Plus one more thing. He's got to be dumb enough to do it... Start getting ready.
Axis
"I have prepared Nijmegen Bridge for demolition... if I blow it up tonight. This Operation Market Garden must fail."
"Why do all my generals want to destroy my bridges?"
|
|
Preparing for battle
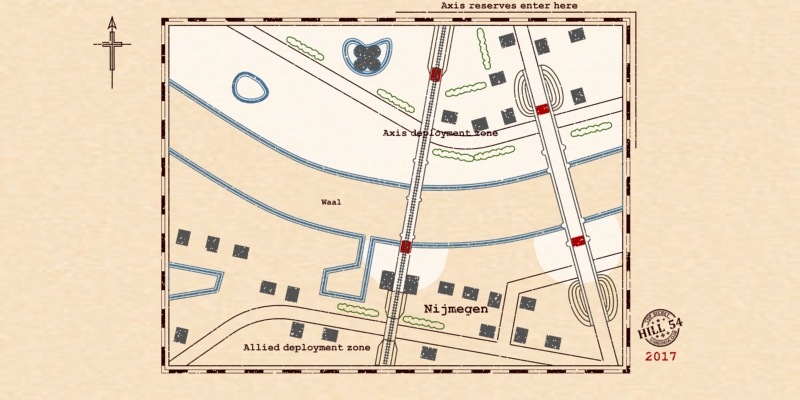
- The Axis deployment zone include all of the table north of the Waal and extends to within 20cm from both objectives south of the Waal.
- Place four objectives as shown on the map.
- The Axis players nominates at least half of their platoons to be held in Delayed Reserve. When Axis Reserves arrive on the table, they will do so at the indicated table edges, extending from the north-eastern corner, 120cm along the northern edge, and to the river bank along the eastern edge.
- The Axis players deploys the remaining platoons in their deployment zone.
- The Allied players now deploy their entire force on the table, more than 30cm from enemy teams.
- Starting with the Axis players, both sides now deploy any Warrior teams that are not part of a platoon, and all Independent teams. Warriors and Independent teams may also be held in reserve, providing that at least one platoon that they can legally join held in reserve, in this case, they will arrive from reserve with that platoon.
|
|
Beginning the Battle
- Starting with the Allied players, both sides may now make Reconnaissance Deployment moves for any Recce teams they have on table.
- The Allied players have the first turn. As both sides are in Prepared Positions, all platoons may begin the game Dug In.
Ending the Battle
The battle ends on or after turn eight when either:
- the Alled players have fulfilled the Both Ends At Once special rule at the start of their turn, or
- the Axis players starts their turn with no Allied teams within 16”/40cm of either Objective.
Deciding Who Won
The Allied players win if they start their turn in possession of a bridge, or both objectives in the Axis deployment zone. The road to Arnhem is open at last.
Otherwise the Axis players win. The Allies have failed to secure a bridgehead across the river Waal, and Market Garden is likely to stop here.
Calculate your Victory Points using the Victory Points Table below.
|
|
Mission Special Rules
The River Wall mission uses the Both Ends At Once, Prepared Positions (page 264), Delayed Reserves (page 269), The River Is Wide… and Only Protection special rules.
Both Ends At Once
In order to win, the Allied players must hold both objectives of one of the bridges, or both objectives in the Axis deployment zone. Otherwise the Axis players win.
The River Is Wide...
The Waal river is more than 20cm wide, but unlike normal, it can still be crossed using the Crossing Rivers rules (page 56), with the following exceptions.
Infantry and Man-packed Gun teams may only move 20cm into the River each turn they are crossing the river, however, they may begin crossing, even if there are enemy teams on the opposite bank.
Enemy teams on the opposite bank can be assaulted from the river directly once within 20cm of the assaulting teams.
Only Protection
The 376 Parachute Field Artillery supplemented with all available British Artillery supported the crossing with a ten minute concentration fire on the target area. Dive bombers and rocket firing typhoons bombed and strafed the area as well.
In addition crossing area was smoked by artillery and mortars just before the crossing.
Tanks on the southern bank would fill in blanks of the smoke.
Once per game, the Allied players may call in an off-map bombardment that will pin down all Axis platoons and cover the entire river (including the bridges where they span them), and the Axis deployment Zone. There are no rolls required for ranging in, the bombardment always succeeds.
Victory Point Table
The winning players has lost one or no platoons - Stunning Victory 6:1
The winning players has lost two or three platoons - Major Victory 5:2
The winning players has lost four or more platoons - Minor Victory 4:3
If a winning player started the game with nine or more platoons in the player's own company (not including transport platoons), the first destroyed platoon from that company is ignored when determining the victory points above.
|
| |
|